Rock Collecting Tools: How and When to Use Them
COLLECTING MINERALS in the field can be hard, fun and rewarding work. Knowing the tools to take with you will make your trip more productive. Depending on the kind of mineral you are going after, you might need something like a garden scratcher tool, a shovel, or pry bar. Sieves, buckets, gloves, boxes, hardhats, and a cushion to sit on can be handy also. Here are the standard items that go with us to the field:
Hand lens A good hand lens, or magnifier, is an essential tool for anyone who wants to look at small crystals. When you buy one, you get what you pay for. Any in the price range from about $10 to $35 are good. A cheap one is not worth having. If you are buying a hand lens for the 1st time, get one with 10 magnification (10X).
To use a hand lens, you need two things, adequate light and a clean lens! Sunlight is the best. Use a soft cotton cloth, like an old T-shirt to clean the lens. You will find that the lens needs to be equal distance from your eye and from the mineral you want to see. It takes a little practice to get used to holding the lens only an inch or so from your eye and the specimen up close, but pretty quickly you can learn to use one like a geologist.
Hammers You will need several. Different sizes and types are used for different purposes. Don't forget to use eye protection when using any hammer!
Note: pink paint. I take some ribbing about my paint, but I rarely lose any of my tools! Tools are easy to leave behind on the outcrop, but not so if you paint them with fluorescent paint. From top: geologist's pick, 4-lb. crack hammer, hoe pick, and 8-lb. sledge
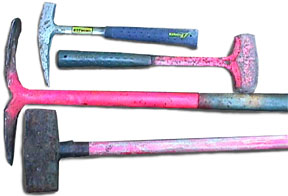
Sledge An 8-pound long handled sledge is used for breaking big rocks into smaller, more manageable pieces. You have to be big and strong enough to use a sledge without hurting yourself.
Crack hammer A 4-pound or 2-pound crack hammer is handy for breaking medium-sized samples or driving chisels.
Geologist's A geologist's hammer is handy for prying rocks apart or out of the ground because it has a pick on one end. Do not use the pick end when trying to break a rock! You will only dull it.
Brick layer's (splitting) hammer A similar specialty hammer is called a bricklayer's hammer. Instead of a pick end, it has a chisel on one end. It is very handy for splitting friable rock when looking for fossils and can be driven with a crack hammer like a chisel.
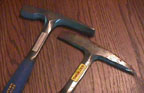 On the left, a chisel-edged brick layer's hammer and on the right, a splitting and trim hammer. Both of these tools are particularly handy when splitting thin bedded rocks while looking for fossils. The brick layer's hammer may be driven, like a chisel into rock fractures, then used to pry out samples.
AGAIN: When using any hammer to strike rock or another steel tool, wear some glasses for eye protection. No specimen is worth the value of an eye!
An unusual hammer I sometimes use has a pick on one end and a chisel on the other. You may also want a small hammer for light trimming of specimens. I recommend you buy Estwing products. They are expensive, but should last many years if you do not lose them. Any good type of large sledge will do. If you buy one with a wooden handle, be sure and carry an extra handle with you to the field in case you split the original.
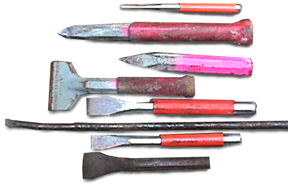
Chisels and gad points You need a good set of these. Some are available with plastic coating on the sides. I buy Craftsman from Sears so if they break, I can get a free replacement. You will need several sizes and lengths, depending on the conditions of the rocks you are working. Various sizes are handy for different jobs. Note very long slender chisel for getting way back into narrow pockets. Sometimes I can work someone's abandoned pocket and get good m/m or T/N specimens due to that one chisel.
Last, but not least, is some personal protection equipment. Safety glasses have saved many an eye. Leather and cloth gloves will protect your hands from flying rock chips and help prevent blisters.
Don't forget some boxes, flats, or buckets for your samples and tools, along with wrapping paper for your treasures!